One of the hardest things about summer, in my 15 years as a registered dietitian, is making healthy snacks for the beach. After spending countless days at the beach with my family in Portland and working with hundreds of clients, I’ve come up with a foolproof way to make beach-friendly snacks that won’t go bad, even in the heat.
Most families eat chips and sugary snacks that have been processed because they don’t know how to make healthy snacks that will last in the heat. I learned at work that the key to making healthy beach snacks is not finding magical foods, but knowing how food science works and how to get them ready ahead of time.
The Science of Spoilage: Why Beach Snacks Don’t Work
When I first became a dietitian, I made every mistake I could. I would pack nice salads that went bad after a few hours and protein-rich foods that became unsafe. The turning point came when my 8-year-old daughter asked why our “healthy beach snacks” always went bad while other families ate fresh food all day.
This made me look into food science and figure out how to make healthy beach snacks. What matters most? Knowing that bacteria grow quickly in the “danger zone” temperature range of 40 to 140 degrees Fahrenheit and picking ingredients that naturally don’t go bad.
Research indicates that certain foods remain safe and nutritious in elevated temperatures due to their inherent pH levels, water activity, and germicidal properties. These ideas are the basis for my system:
- Bacteria can’t grow in foods that don’t have a lot of moisture.
- Foods that are high in acid make it hard for bad bacteria to grow.
- Hard-boiled eggs and other foods that are naturally preserved stay stable.
- Strategic layering keeps things from getting mixed up.
The Carter Method: My 5-Step Guide to Making Snacks for the Beach
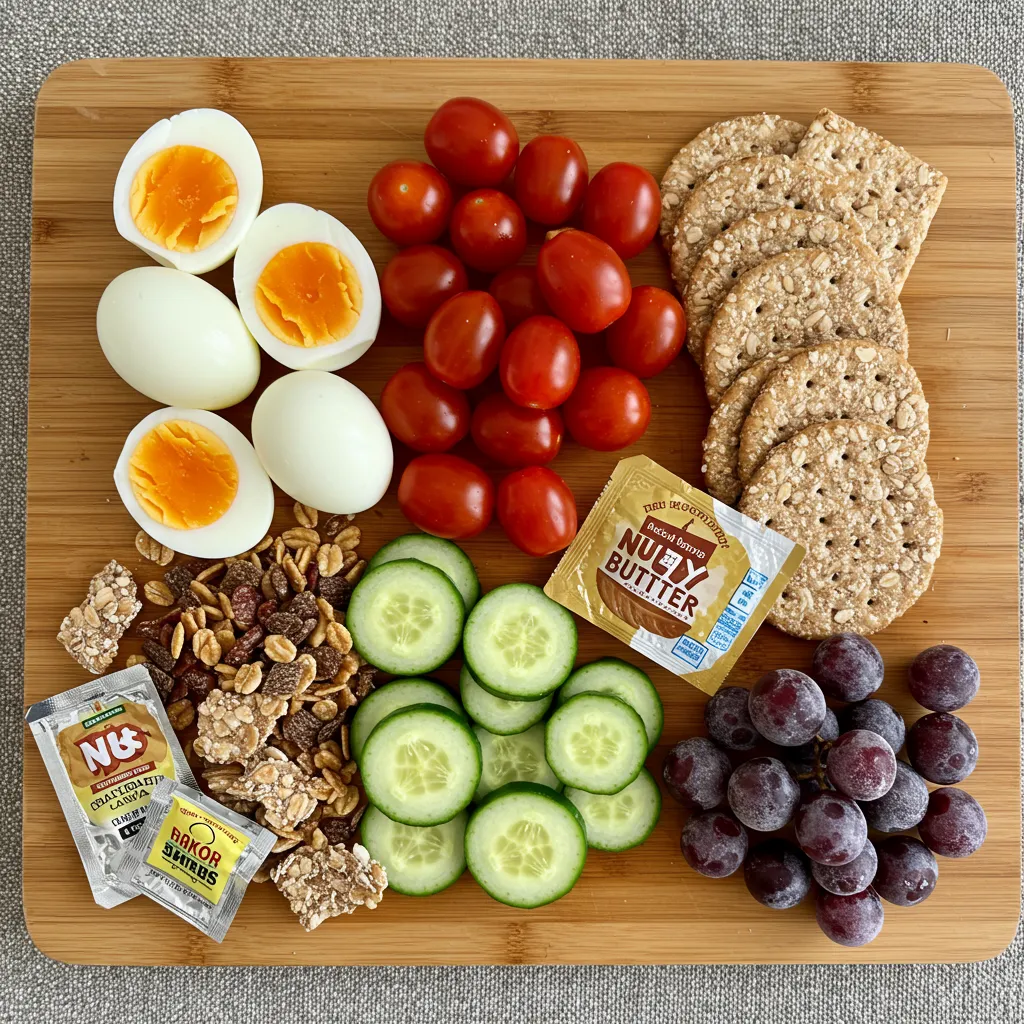
Step 1: Pick your food carefully
I’ve tried hundreds of different combinations and found healthy beach snacks and meal prep staples that always work:
Proteins that don’t break down when you heat them up:
- Hard-boiled eggs (stay fresh for more than 8 hours when cold)
- Individual packets of nut butter
- Low-sodium jerky made from beef or turkey
- Roasted chickpeas
- String cheese in containers that keep the heat in
Strong carbohydrates:
- Whole grain crackers in sealed bags
- Trail mix with dried fruit that has already been cut into pieces
- Homemade granola bars
- Rice cakes
Strong New Options:
- Cherry tomatoes (they keep their shape better than big ones)
- Peas and carrots for babies
- Apple slices (soak in lemon juice)
- Grapes (you can freeze them to make ice packs that you can eat)
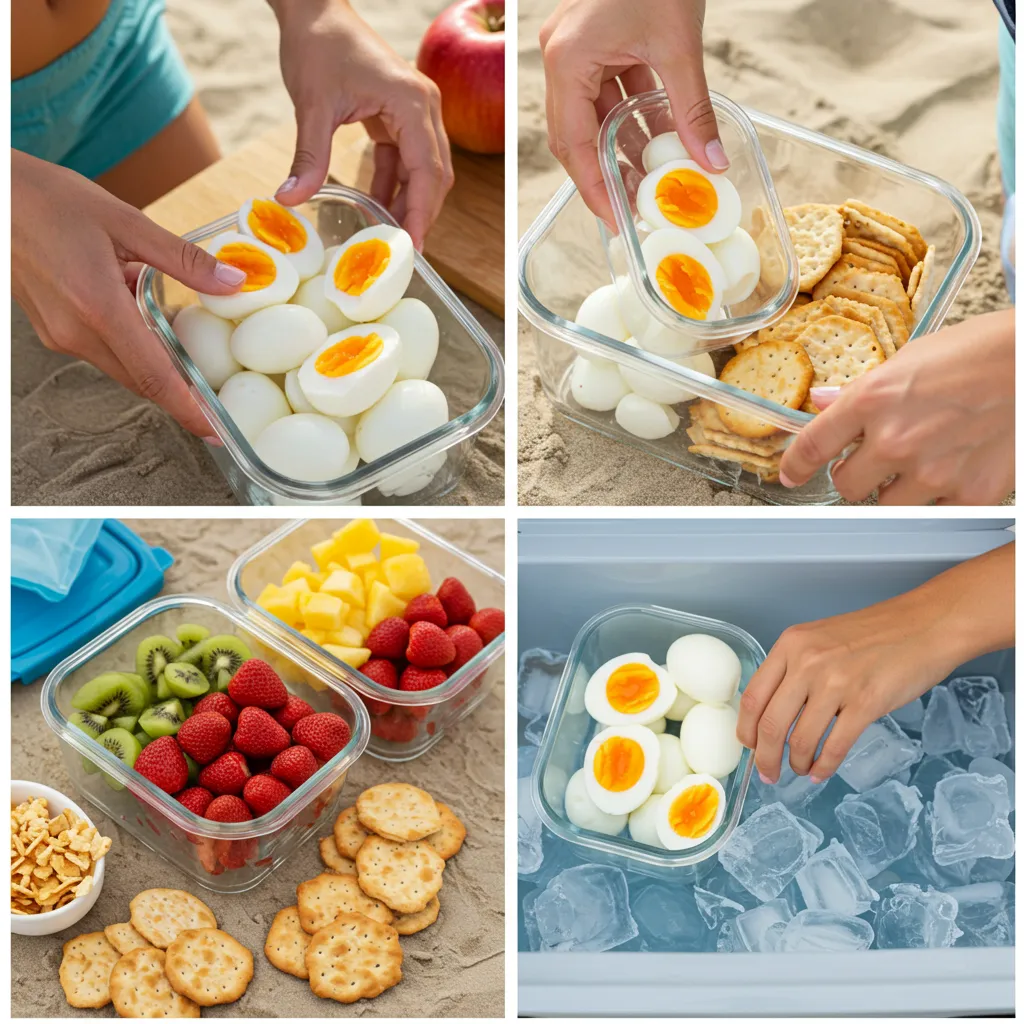
Step 2: The 2-Hour Prep Timeline
90 Minutes Before Leaving:
- The 12-minute method is how to hard-boil eggs.
- Cut up and wash fresh fruits and vegetables.
- Make different kinds of trail mix.
- Get the area ready for assembly
30 Minutes Before You Leave:
- Pack in layers that keep the temperature steady.
- Put in frozen things and ice packs.
- Check the seals on the containers.
- Put the cooler in a smart way
Step 3: A way to keep the temperature under control
This is where most people fail when they try to make healthy beach snacks. The way I know how to layer:
Bottom: Large ice packs or bottles of frozen water Second: Things that go bad quickly, such as eggs, cheese, and cut fruit Third: Snacks that don’t spoil right away, like nuts and crackers Top: Things that don’t go bad Important: Don’t let wet and dry things touch each other.
Step 4: Safety Protocol Timeline
0–2 hours: At beach temperatures, all foods are safe to eat. 2 to 4 hours: Eat the things that spoil first. Four or more hours: Things that can be stored on a shelf are safe. You should throw away things that have been in direct sunlight for more than an hour right away.
The Best 6 Beach Snack Combinations I’ve Tried
1. Power Packs from the Mediterranean
- Two hard-boiled eggs, cut in half
- 1/4 cup of cherry tomatoes
- 2 tablespoons of kalamata olives
- A small container of hummus
- Whole grain pita chips
Why they work: They have healthy fats and full protein that taste better when they are warmed up a bit.
2. The Best Tropical Trail Mix
- 1/2 cup of almonds that have been roasted
- 1/4 cup of dried pineapple with no sugar added
- 2 tablespoons of coconut flakes
- 1/4 cup of dark chocolate chips (70% cocoa)
- A little bit of sea salt
3. Boats with protein and vegetables
- Cucumber cut into boat shapes
- For each serving, use 2 tablespoons of almond butter.
- Putting cherry tomatoes on top
- Seasoning for all kinds of bagels
4. Grain bowls that are great for the beach
- 1/2 cup of quinoa that has cooled down
- 1/4 cup of bell peppers cut into small pieces
- 2 tablespoons of feta cheese
- 1 tablespoon of lemon-olive oil dressing
- Fresh herbs
5. No-Melt Energy Bites (makes 12)
- 1 cup of dates with the pits taken out
- A half cup of whole almonds
- Two tablespoons of cocoa powder
- 1 tablespoon of coconut oil
- A little bit of sea salt
6. Frozen grapes that give you energy
Wash two cups of grapes, freeze them overnight, and then put them in a container that keeps them warm. They slowly thaw, which cools things down and gives them strength.
Advanced Methods for Organizing Container Hierarchy
Level 1: Critical Temperature Control: Glass containers with silicone seals for protein and dairy. These stay at the same temperature for 40% longer than plastic.
Level 2: Keeping the moisture in check: Boxes with separate sections and packets of desiccant for nuts and crackers.
Level 3: Strategic Separation: Individual portion bags stop things from getting mixed up.
The Plan for Ice Packs
A lot of families don’t use enough ice packs or don’t put them where they need to be:
- For every three pounds of food, you need one pound of ice.
- Placement: Always on the bottom and sides, never just on top.
- Type: You can drink water and use frozen water bottles as ice packs.
- Backup: Frozen grapes help keep things even cooler.
Fixing Common Problems
“My Food Gets Soggy” Solutions:
- Paper towels stacked on top of each other soak up water.
- Don’t mix wet and dry ingredients until you’re ready to eat.
- Choose vegetables that are naturally crunchy.
- Use containers for the system that drains water
“Everything Goes Bad Quickly” Safety Rules:
- Rule for perishables: 2 hours
- Make sure to check the temperature of the things in the cooler.
- Use your eyes to look for signs of spoilage.
- If you don’t know, get rid of it.
Plans for “Kids Don’t Want to Eat Healthy Options”:
- Let the kids help with the prep.
- Use spices that you know well
- Make your presentations fun
- Change method step by step
Essential Equipment Investment
The Containers You Need ($75–$100 total)
- Glass containers with lids that don’t leak
- Bento boxes are boxes with compartments.
- Insulated lunch bags
- Silicone bags for keeping things safe
Tools for keeping the temperature under control
- A cooler that works very well
- Different types of ice packs
- A thermometer for the cooler
- Covers for coolers that reflect light
The Basics of Your Beach Snack System
Week 1
Here are three easy and healthy beach snack meal prep ideas to get you started:
- Eggs that have been hard-boiled and cherry tomatoes
- Apple slices with nut butter
- Making your own trail mix
Instead of trying to follow complicated recipes, just make sure you get the timing and storage right.
Week 2: Growth
Put in three new sets of things. Try out different types of containers and see which ones work best for your family.
Success in the Long Run
- Using fruits that are in season to change
- Making a batch for more than one trip
- Keep track of combinations that work
- A mindset of always getting better
The Health and Financial Impact
Clients say that learning how to make healthy beach snacks meals has long-lasting effects:
Health benefits:
- Better overall nutrition
- More energy on the beach days
- Eating less processed foods
Effect on money:
- Average savings: $40 to $60 for every trip to the beach
- Less food waste happened because of better planning.
- Buying tools that last pays off in the long run
Learning Life Skills:
- Better at planning
- Knowing about food safety
- Being aware of the environment by using less packaging waste
What’s Next for You
The Challenge for 14 Days
For at least two trips to the beach, stick to my meal prep system for healthy beach snacks. This gives you time to boost your confidence and see real results.
Week 1: Learn the basics and how to keep things safe Week 2: Add more choices and make your preferences more specific.
A Big Investment
Needs right now: Good cooler, glass jars, and ice packs ($75–125) More to come in the future: More choices and specialized tools ($50 to $75)
The End
Making healthy beach snacks doesn’t mean you have to be perfect. It’s all about moving forward. Instead of buying processed snacks, you should make your own. It’s better for your family’s health, saves you money, and gives you good food memories.
This system is based on 15 years of professional experience, feedback from clients, and testing with family. Start with small steps, be patient as you learn, and celebrate each little victory.
The point isn’t to make spreads that look good on Instagram. The goal is to give people safe, tasty, and healthy choices that will help everyone enjoy the beach. Your future self will thank you when you open that perfectly packed cooler instead of spending $30 or more on snacks at a convenience store.